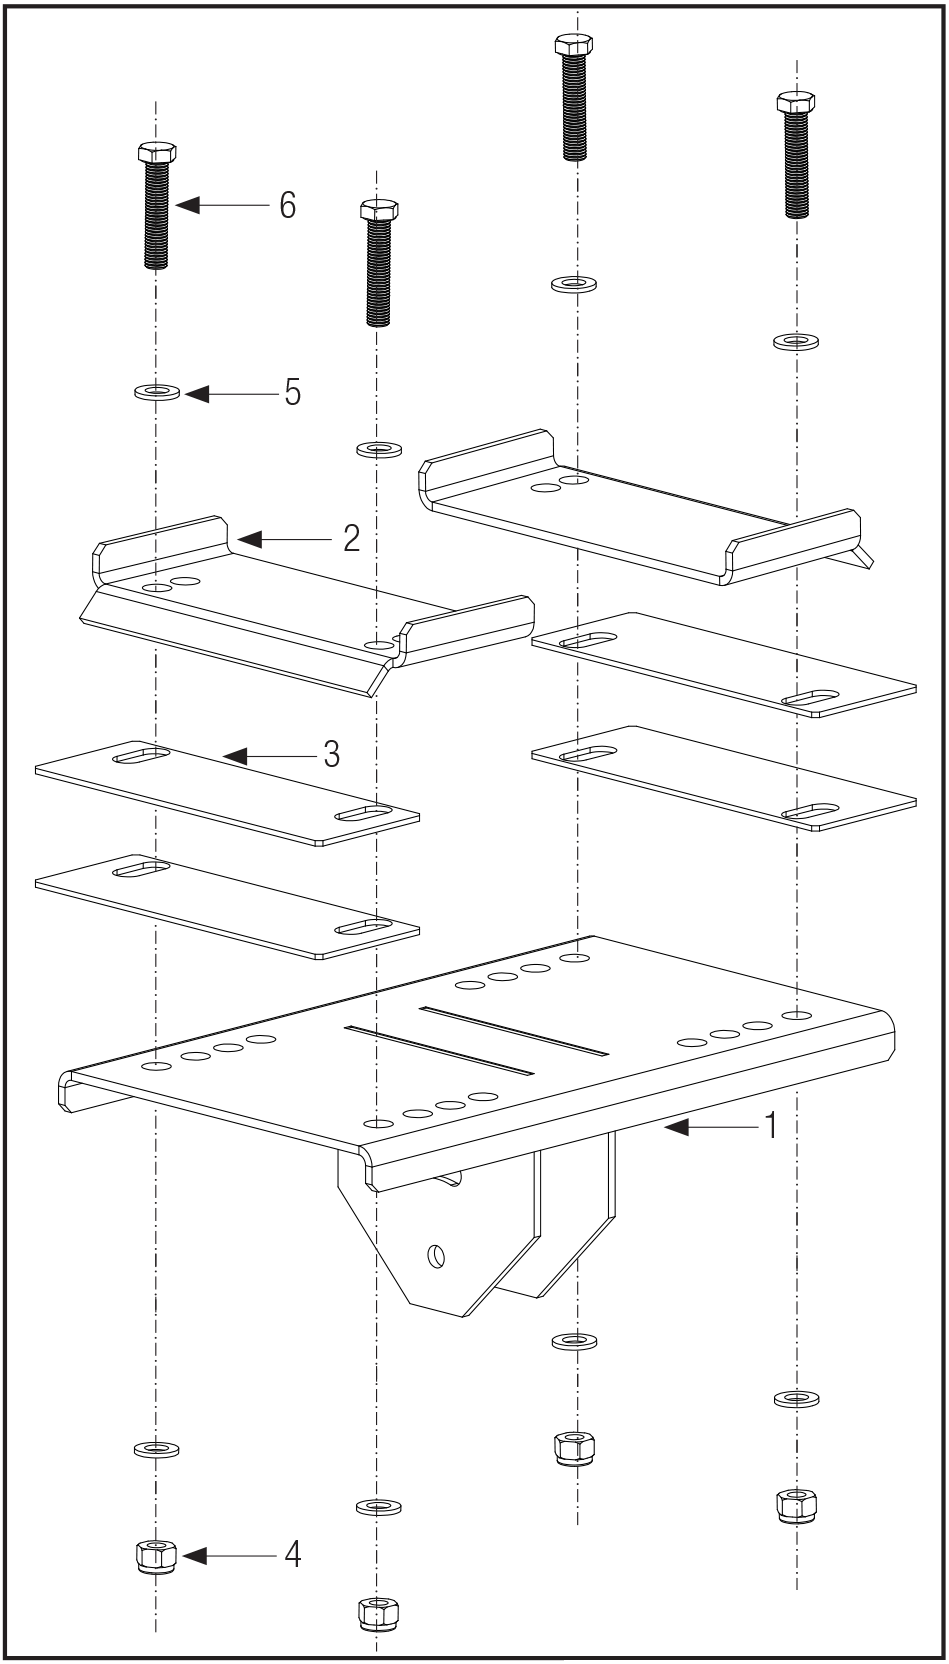
Il kit KT-I-BEAM include:
– piastra (1)
– 2x contropiastra (2)
– 4x spessore (3)
– 4x dado autobloccante M12 (4)
– 8x rondella (5)
– 4x vite M12 (6)
KT-I-BEAM
COMPONENTI
COMPONENTES
El kit KT-I-BEAM incluye:
– soporte (1)
– 2x abrazadera (2)
– 4x espaciador (3)
– 4x tuerca autoblocante M12 (4)
– 8x arandela (5)
– 4x tornillo M12 (6)
KOMPONENTEN
Das kit KT-I-BEAM beinhaltet:
– Klammer (1)
– 2x Rückklammer (2)
– 4x Keil (3)
– 4x Sicherungsmuttern M12 (4)
– 8x Unterlegscheiben (5)
– 4x Schrauben M12 (6)
COMPONENTS
The KT-I-BEAM kit includes:
– bracket (1)
– 2x clamp (2)
– 4x spacer (3)
– 4x M12 locknut (4)
– 8x washer (5)
– 4x M12 bold (6)
COMPOSANTS
Le kit KT-I-BEAM comprend:
– plaque (1)
– 2x contreplaque (2)
– 4x épaisseur (3)
– 4x écrou autobloquant M12 (4)
– 8x rondelle (5)
– 4x vis M12 (6)
COPPIE DI SERRAGGIO BULLONERIA TE E TCEI – FILETTARURA METRICA PROFILO TRIANGOLARE PASSO GROSSO – CLASSE 8.8
RECOMMENDED BOLT TORQUE FOR COARSE THREADED METRIC STEEL BOLTS TE-TCEI GRADE 8.8
PAR DE TORSIÓN RECOMENDADO PARA PERNOS DE ACERO MÉTRICO DE ROSCA GRUESA TE-TCEI GRADO 8.8
COUPLE DE SERRAGE RECOMMANDÉ POUR LES BOULONS EN ACIER MÉTRIQUE À FILETAGE GROSSIER CLASSE TE-TCEI 8.8
EMPFOHLENES ANZUGSMOMENT FÜR METRISCHE STAHLSCHRAUBEN MIT GROBGEWINDE TE-TCEI KLASSE 8.8
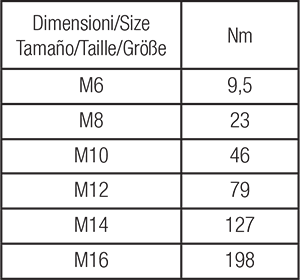
Utilizzare i valori riportati in tabella per il serraggio dei tutta la viteria fornita.
Use the values shown in the table to tighten all the screws supplied.
Utilice los valores que se muestran en la tabla para apretar todos los tornillos suministrados.
Utilisez les valeurs indiquées dans le tableau pour serrer toutes les vis fournies.
Verwenden Sie die in der Tabelle angegebenen Werte, um alle mitgelieferten Schrauben festzuziehen.
INSTALLAZIONE – INSTALLATION – INSTALACIÓN- INSTALLATION – INSTALLATION
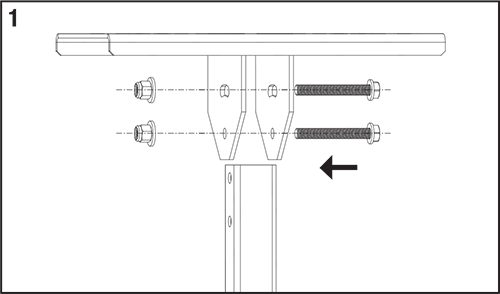
Fissare il tubolare del ventilatore alla piastra (1) utilizzando viti M12, dadi autobloccanti, rondelle standard e rondelle a tazza forniti nel kit motore.
Fix the fan downrod to the bracket (1) by means of the M12 bolts, locknuts, standard washers and spring washers supplied into the motor kit.
Fije la barra de extensión del ventilador al soporte (1) por medio de los pernos M12, las contratuercas, las arandelas estándar y las arandelas de resorte suministradas en el kit del motor.
Fixer le tube du ventilateur à la plaque (1) à l’aide de vis M12, écrous autobloquants, rondelles standard et rondelles de base presents daus le kit moteur.
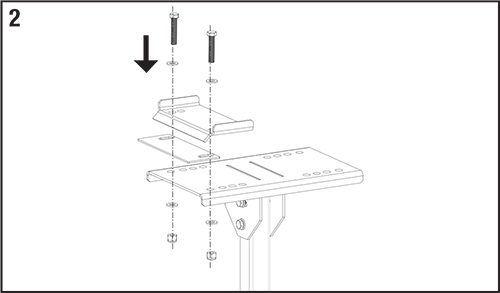
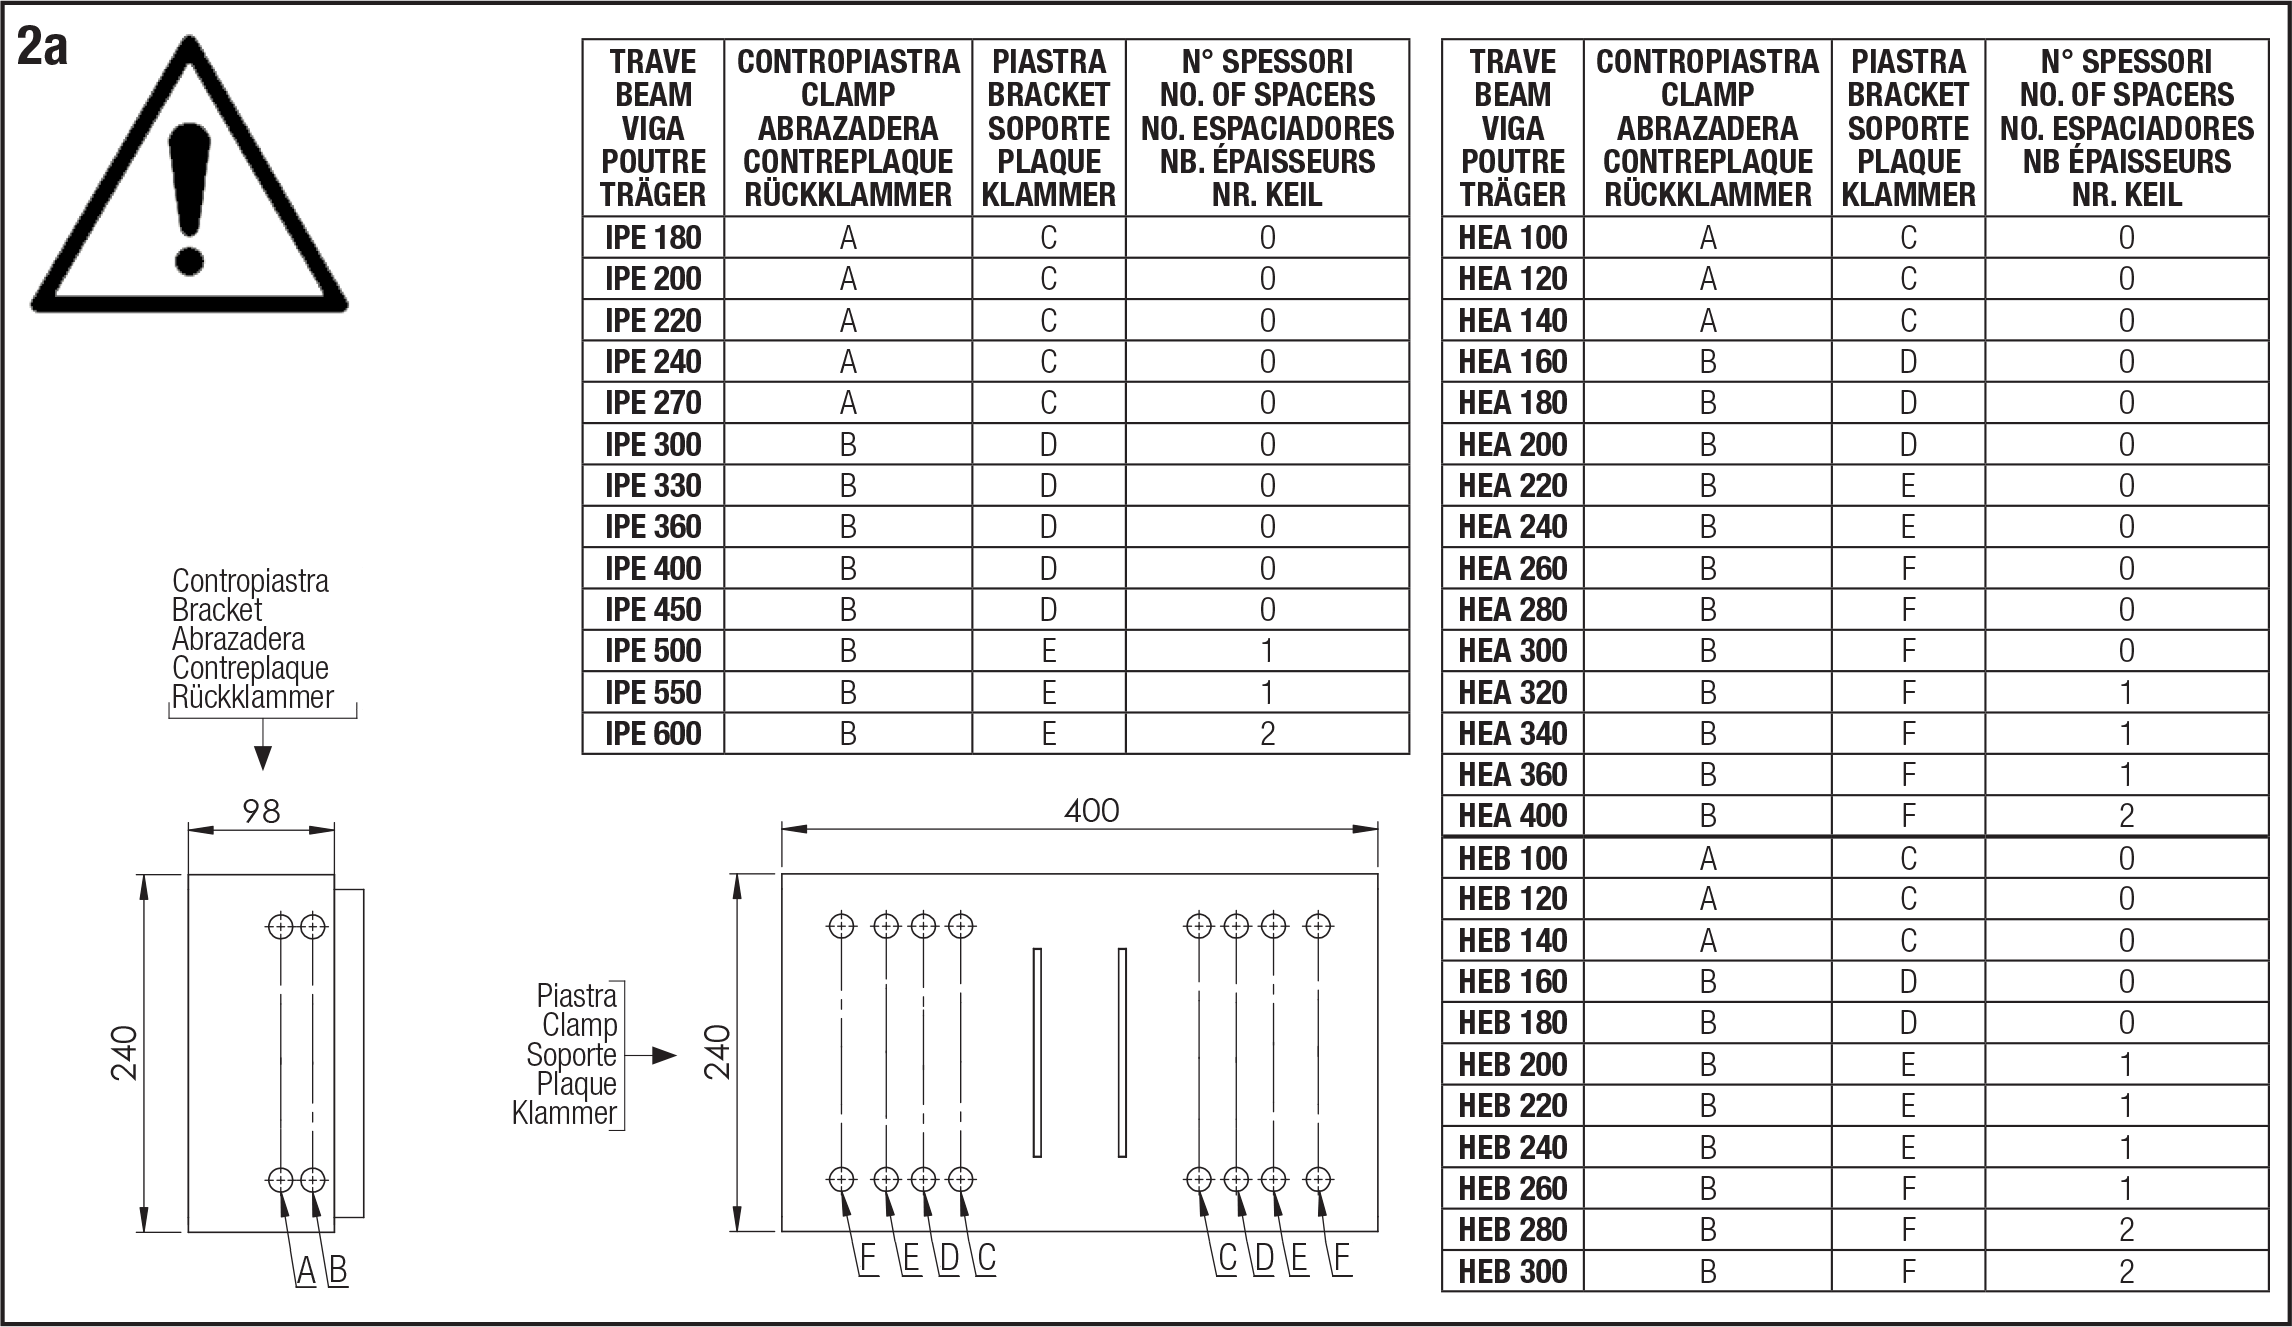
Fissare la piastra (1) ad una delle contropiastre (2) utilizzando dadi M12 (4), rondelle (5), viti M12 (6) ed eventualmente spessore/i (3) forniti nel kit KT-I-BEAM, come indicato in Fig. 2a.
Assemble the bracket (1) to one of the clamps (2) by means of the M12 locknuts (4), washers (5), M12 bolts (6) and, if needed, spacers (3) supplied in the KT-I-BEAM kit – see Fig. 2a.
Una el soporte (1) a una de las abrazaderas (2) por medio de las tuercas autoblocantes M12 (4), arandelas (5), pernos M12 (6) y, si es necesario, separadores (3) suministrados en el KT-I-BEAM Kit – ver Fig. 2a.
Fixer la plaque (1) à une des contreplaques (2) utilisant les écrous (4), rondelles (5), vis (6) et éventuellement un ou plusieurs épaisseurs (3) fournies dans le kit KT-I-BEAM, voir Fig. 2a.
Setzen Sie die Klammer (1) und einer Rückklammer (2) zusammen, durch den M12 Sicherungsmuttern (4), Unterlegscheiben (5), M12 Bolzen (6) und, wenn notwendig, den Klein (3), die in dem KT-I-BEAM Kif geliefert werden, Abb. 2a.
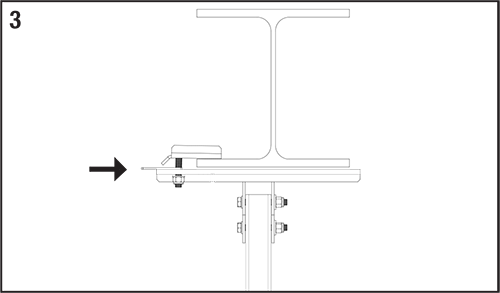
Posizionare l’assemblato piastra/contropiastra (1-2) sull’ala della trave.
Position the bracket/clamp assembly (1-2) on the beam wing.
Coloque el conjunto de soporte/abrazadera (1-2) en la viga.
Placer l’ensemble plaque/contreplaque (1-2) sur un côté de la poutre.
Montieren Sie die Klammer/Rückklammer Zusammenbau (1-2) an dem Träger-Arm.
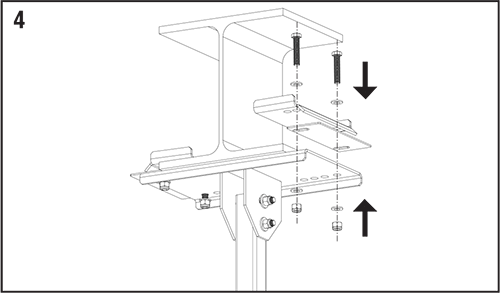
Fissare la seconda contropiastra (2) alla piastra (1), come descritto in Fig. 2.
Assemble the second clamp (2) to the bracket (1) as described in Fig. 2.
Una la segunda abrazadera (2) al soporte (1) como se describe en la Fig. 2.
Fixer la deuxième contre-plaque (2) à la plaque (1), come indiqué en Fig. 2.
Setzen Sie die zweite Rückklammer (2) an dem Klammer (1) wie in Abb. 2 geschrieben.
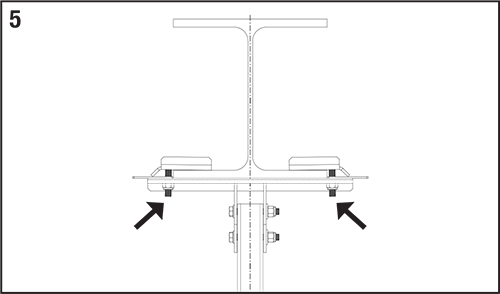
Posizionare la piastra (1) in asse con la trave e serrare tutti i dadi (4).
Align the bracket (1) to the beam and tighten all the bolts (4).
linee el soporte (1) a la viga y apriete todos los pernos (4).
Placer la plaque (1) dans l’alignement de la poutre et serrez tous les écrous (4).
Richten Sie die komplette Klammer (1) an dem Träger aus und ziehen alle Bolzen (4) an.